Using Simulation for Testing and Continuous Integration
Posted on May 20, 2019 in software
Software developers are quickly running out of viable excuses for buggy and un-testable software. Many free and open-source tools are now available that can help developers create and maintain a set of automated tests for their software. Automated tests help improve software quality [1]. Additionally, code that is testable is often times indicative of good design. Conversely, software that is untestable is often buggy and expensive to maintain and extend. This post looks at how we have approached software development and testing for Bobble-Bot. In order to develop and test Bobble-Bot's software, we have employed the following free tools: Google test, GitLab CI, ROS-test, Gazebo, and Jupyter Notebook. This post will summarize some of these tools and how we made use of them. Hopefully this information will help other developers create quality software systems of their own.
Testing Bobble-Bot Software
One of the main design goals for Bobble-Bot was to open up the software development process to the open-source community. This facilitates collaboration and learning, but it also introduces some risk. How can we ensure that our software continues to work as developers from around the world make contributions? Fortunately, this is a problem that has been solved many times over by the open-source software community. To mitigate the risk, we simply stand on the shoulders of giants. Bobble-Bot, like many other open-source projects, relies on an automated testing and continuous integration pipeline in order to ensure that our software remains in a working state.
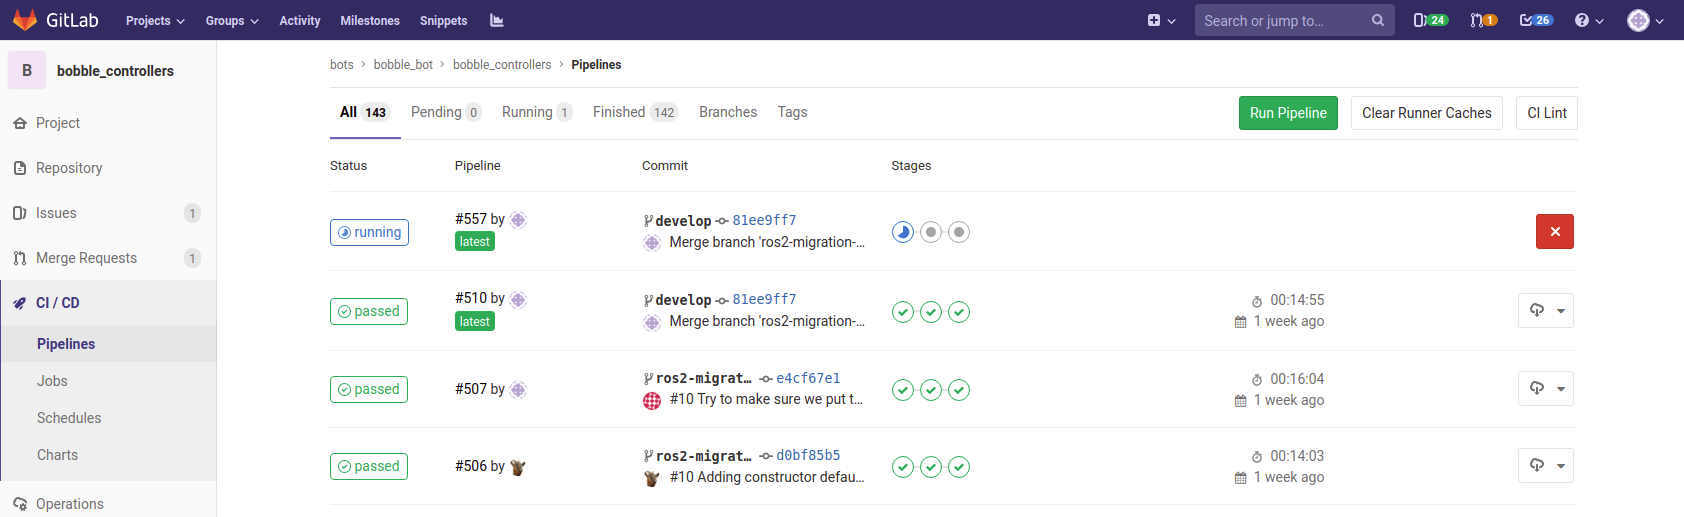
What this all means is that every time a change is submitted to our project's GitHub repository, an automated build and testing pipeline is triggered. This testing pipeline is comprised of stages which build, test, and analyze the proposed changes. The picture above is a view of the pipeline in action. The testing stage includes eighteen different pass/fail checks that are performed on the balance controller using our simulator. The analyze stage produces a summary Jupyter notebook which is automatically uploaded to our build server as the final and primary output of the testing pipeline. This notebook is a document that is manually reviewed before accepting the proposed software changes to our development baseline. The table below describes the tests that are done and provides links to the actual source code for each test.
| Test Name | Description | Source Code |
|---|---|---|
| No Balance | Bobble-Bot uncontrolled | no_balance.test |
| Impulse force | Balance control active, impulse applied. | impulse_force.test |
| Balance Control | Balance control active, drive around. | balance_controller.test |
| Drive square | Balance control active, drive in square. | js_drive_square.test |
Testing Hardware via Simulation
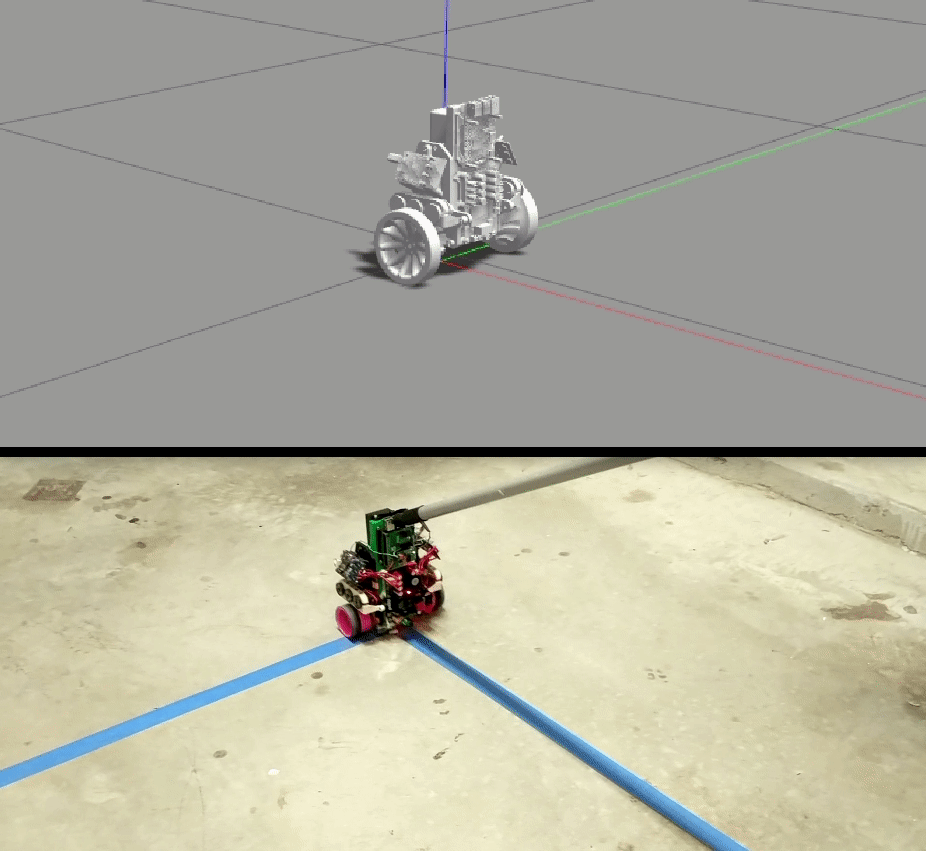
Simulation can be an invaluable tool for automated testing. For Bobble-Bot, we use Gazebo as our simulation environment of choice. Gazebo was selected because it is free and it integrates well with ROS. Of course, in order for your test results to be trustworthy, your simulation must adequately approximate reality. Check out this post where we establish the validity of the Bobble-Bot simulation. The summary gif below captures what the "impulse_force.test" actually looks like both in simulation and reality. Looks close enough to us!
Reporting Test Results
Comprehensive automated tests are owesome, but what should you do with all that data generated by your tests? In most cases, you want a clear way to summarize the results. Additionally, it would be great if the results were easily reproducible by others. For science!
For Bobble-Bot, we went with Jupyter Notebook. Jupyter is a commonly used open-source tool in data science. It allows for organizing and sharing data processing and analysis code in a readable notebook style format. There are many great examples of Jupyter Notebooks available for free on the web.
We used Jupyter to author a test summary notebook that presents the simulation data recorded during our automated tests. The best part is that the generation of the summary report can also be automated. We generate the report within an analysis stage of our continuous integration pipeline. The report gives developers insight into how their changes impact the integrated controller performance. Here is a sample section from the report. The full report contains summary plots from the no balance test, the impulse response test, and the driving tests. The source notebook for the full report can be found here.

We use this report to ensure that any software modifications made to Bobble-Bot's embedded controller are well vetted in simulation first. This reduces our risk of damaging hardware due to inadvertent software bugs. It also helps us to quickly evaluate proposed software changes from the open-source community prior to merging them into the main-line of development.
Writing Integration Tests with ROS & Gazebo
This could easily be a post in its own right. Maybe at some point I'll write one up with more detail. In the mean-time, checkout the code found here to see how Bobble-Bot uses a Gazebo simulation to perform its automated integration tests. Here's an outline of the basic steps to follow for any ROS + Gazebo integration test.
Include test dependencies in package.xml
We added the following lines as test dependencies to our package.xml file. Our integration test requires an IMU model that our controller code does not actually depend on. This is the "hector_gazebo_plugins" test dependency shown below.
<test_depend>rostest</test_depend>
<test_depend>xacro</test_depend>
<test_depend>hector_gazebo_plugins</test_depend>
<test_depend>rosunit</test_depend>
Include rostest in CMake
Add lines like the following in order to add your tests to CMakeLists.txt. Our full CMakeLists.txt is here.
find_package(
  catkin
  REQUIRED COMPONENTS
  rostest
)

catkin_package(
  INCLUDE_DIRS include
  LIBRARIES ${PROJECT_NAME}
  CATKIN_DEPENDS
  rostest
)

if (CATKIN_ENABLE_TESTING)
    add_rostest_gtest(balance_controller_test
          test/balance_controller.test
          test/balance_controller_test.cpp)
    target_link_libraries(balance_controller_test ${catkin_LIBRARIES})
endif()
Write a test
This is a snippet of code from our balance test cpp file that is responsible for doing the simulated right turn at the very end of our simulation based integration test.
TEST_F(BalanceSimControllerTest, testTurnRight)
{
  // send a turn rate command of -0.1 rad/s
  geometry_msgs::Twist cmd_vel;
  cmd_vel.angular.z = -0.1;
  publish_vel_cmd(cmd_vel);
  // wait for 3s
  ros::Duration(3.0).sleep();
  bobble_controllers::BobbleBotStatus status = getLastStatus();
  const double expected_turn_rate = -25.0;
  // should be turning at least -25 deg/s
  EXPECT_LT(status.TurnRate, expected_turn_rate);
}

int main(int argc, char** argv)
{
  testing::InitGoogleTest(&argc, argv);
  ros::init(argc, argv, "balance_controller_test");

  ros::AsyncSpinner spinner(1);
  spinner.start();
  int ret = RUN_ALL_TESTS();
  spinner.stop();
  ros::shutdown();
  return ret;
}
Write a launch file
You'll want a ROS launch file to use to kick off your test. We use a common launch file for all of our tests in conjunction with one launch file specific to each integration test. Here's the launch file for our balance control test:
<launch>
  <arg name="paused" default="false"/>
  <arg name="gui" default="false"/>
  <include file="$(find bobble_controllers)/test/common.launch">
    <arg name="paused" value="$(arg paused)"/>
    <arg name="gui" value="$(arg gui)"/>
  </include>
  <rosparam file="$(find bobble_controllers)/test/config.yaml"
            command="load"/>
  <test test-name="balance_controller_test"
        pkg="bobble_controllers"
        type="balance_controller_test"
        required="true"
        time-limit="90.0">
  </test>
</launch>
Build and run the test
You can use catkin to build the test, run it, and report the results. We use the command below:
catkin run_tests --verbose --no-deps --this --force-color -j1

catkin_test_results --verbose ../../build/bobble_controllers/
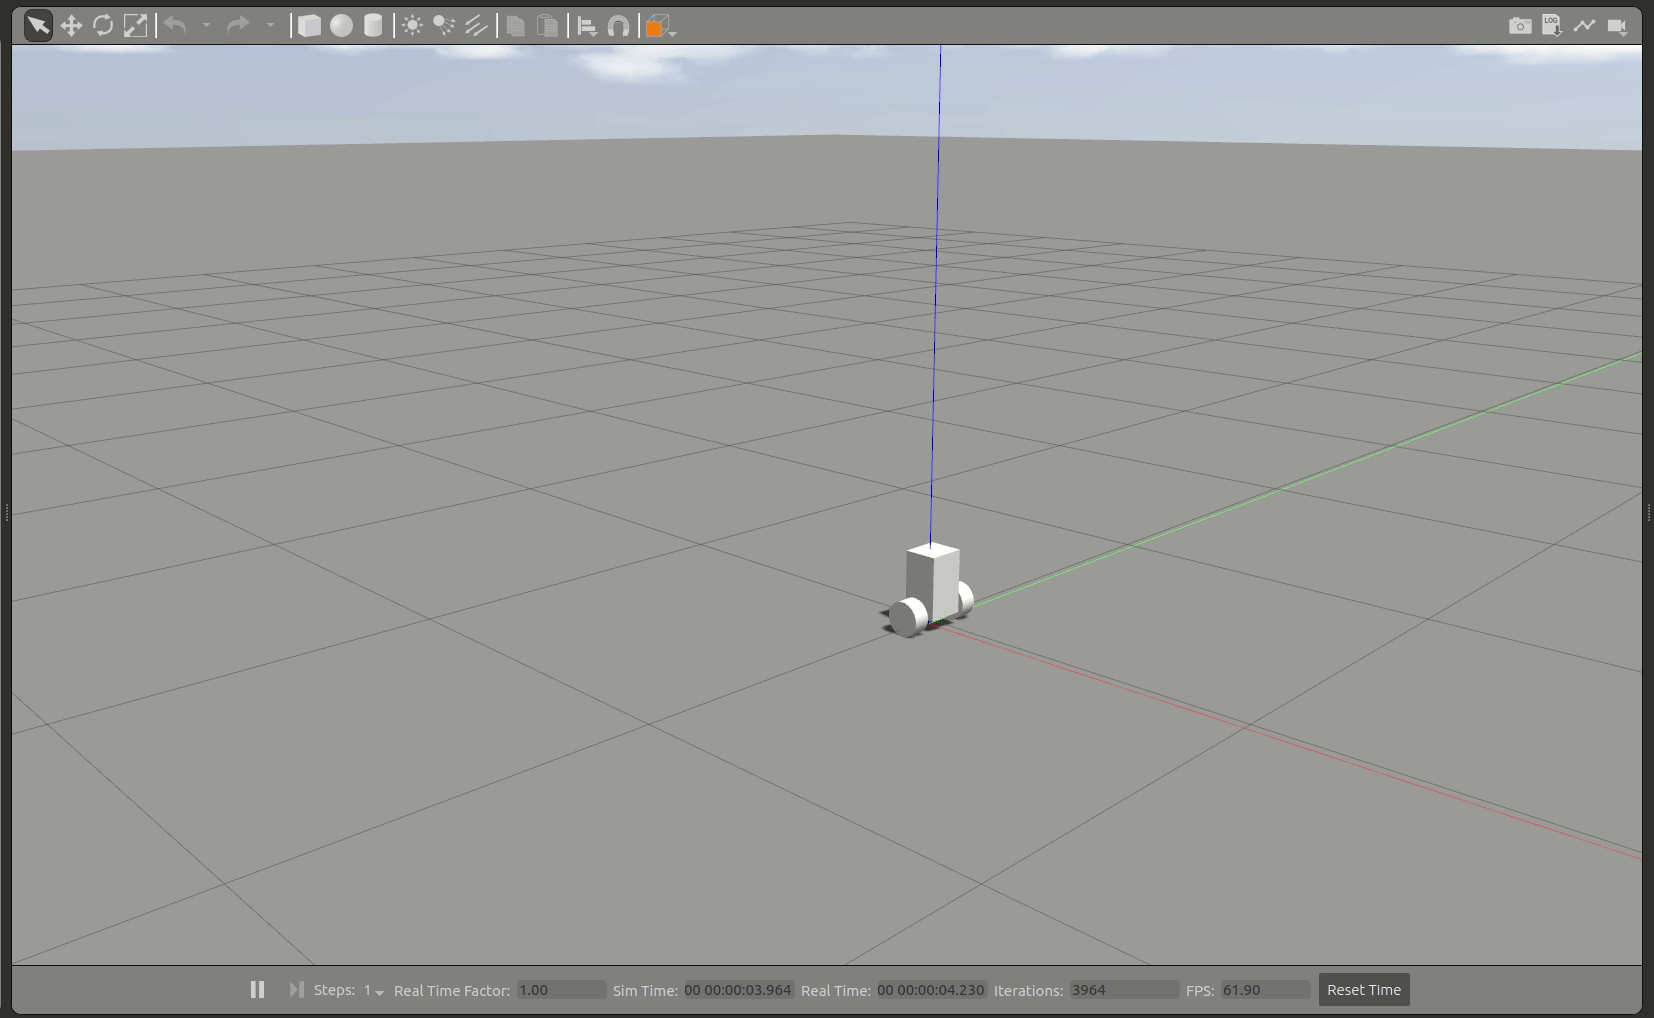
Here's what the simulated integration test actually looks like in Gazebo. As you can see, we use simple 3D meshes for our automated tests.
GitLab CI
Once you have written your test and you have it working on your machine, you are ready to have a build server automate it. This is the step of the process that allows your test to be continually run everytime a change is submitted to the repository. Again, this is a topic that could be a post unto itself, so we just summarize the process and provide reference links for further reading.
For Bobble-Bot, we make use of a private GitLab repository for continuous integration that remains in sync with our public facing GitHub repository. To do this, we rely on a nice GitLab feature for pull and push mirroring to GitHub. Our build server uses a Docker executor to build and test our code within a Bobble-Bot simulation container. Using Docker for Gazebo & ROS simulations is a blog post of its own.
GitLab uses YAML to specify the instructions to be executed by the build server. Here's a summary snippet from our .gitlab-ci.yml file.
catkin_tools_tests:
  stage: test
  script:
  - catkin build --summarize --no-status --force-color
  - catkin run_tests --no-status --force-color -j1
  - mv src/bobble_controllers/test/data/*.csv ..
  - catkin_test_results --verbose .
  artifacts:
    paths:
    - ./*.csv

test_summary_report:
  stage: analyze
  script:
  - cd src/bobble_controllers/test
  - jupyter nbconvert --execute --to html TestSummary.ipynb
  dependencies:
  - catkin_tools_tests
  artifacts:
    paths:
    - ./TestSummary.html
    - ./*.png
    - ./*.csv
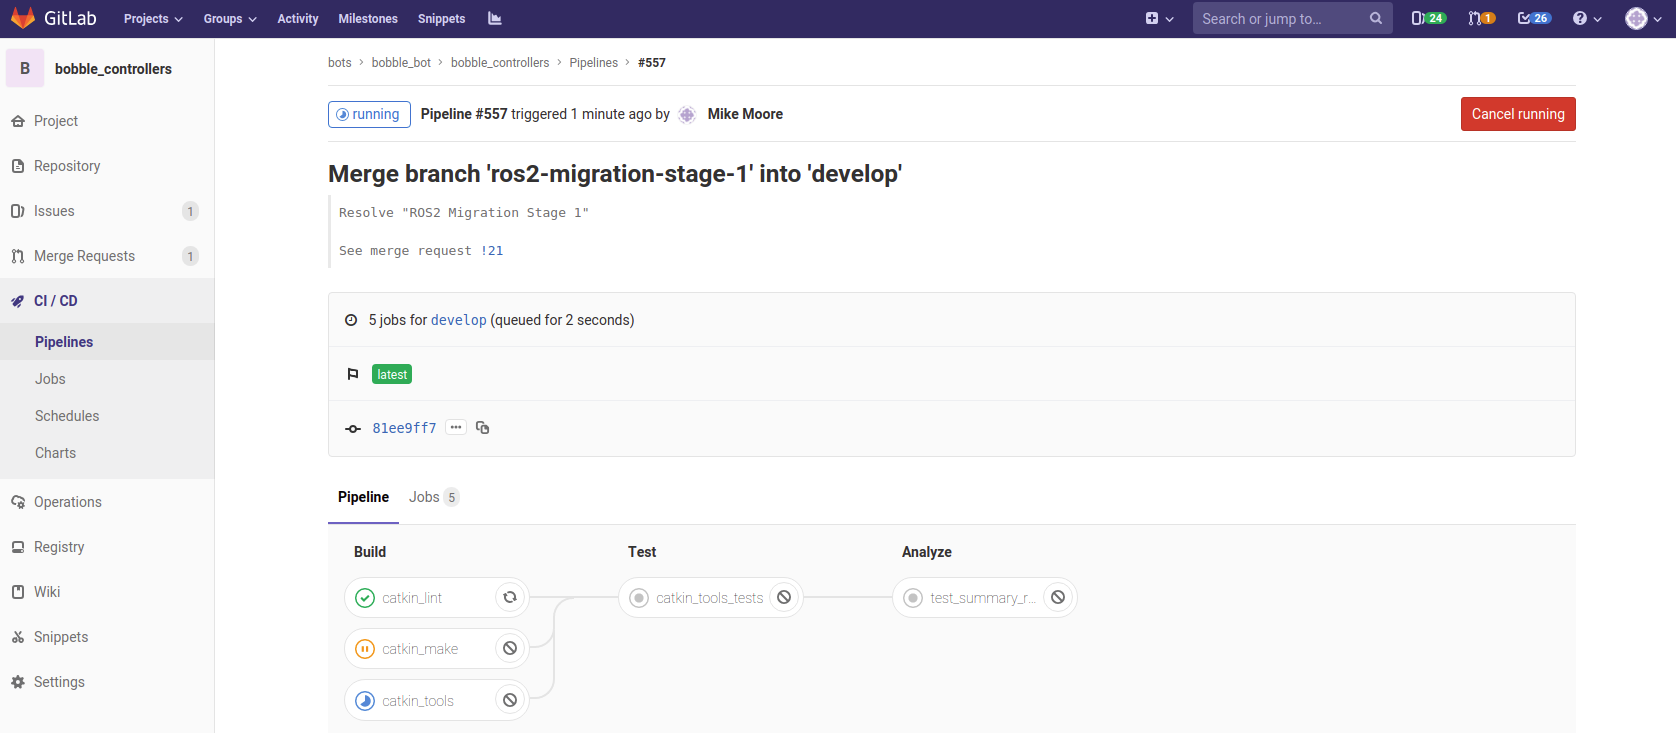
Here's a screen shot of an example pipeline while it's running. As you can see, we are actively developing and testing modifications to support migration to ROS2! Check back soon for an updated post on ROS2 for Bobble-Bot.
More Information
That was a long post covering many topics at a very high level. Hopefully you still found it useful. Check out the references below for more information. Leave any comments and questions below. Thanks for reading!